- What is Role-Based Pricing in WooCommerce?
- Why Use Dynamic Pricing by User Roles?
- Real-World Examples: Where It Fits
- First things first: Build the Roles
- Choosing the Right Tool
- Red flags to avoid
- Quick Comparison Tip
- Step-by-Step Setup
- Step 1: Install the Plugin
- Step 2: Basic Settings and Enable Role-Based Pricing Woocommerce
- Step 3: Map Roles and Sync with Memberships
- Step 4: Configure Global or Per-Product Rules
- Step 5: Set Prices for Variations
- Step 6: Bulk Edit Prices (Practical Example)
- Step 7: Shipping and Taxes by Role
- Step 8: Catalog Mode and Visibility (Optional)
- Step 9: Testing Checklist
- Step 10: Troubleshooting Tips
- Final Launch Steps
- When Role-Based Pricing Works Best
- Conclusion
- Inam Ullah Dar
Why should every customer see the same price?
Walk into a shop. A wholesaler buys ten boxes of products. A regular buyer picks one. Do they pay the same? Of course not. But online? That’s often how it works. Everyone sees one price. Feels unfair, right?
Dynamic user role-based pricing WooCommerce changes that. It’s like bringing real-world deals into your WooCommerce store. Wholesalers get bulk prices. VIPs get rewards. Retail buyers see the usual. Simple. Smart. Fair.
This guide will walk you through the idea. Why it matters. And how to actually set it up. Step by step. No fluff. Just practical tips and a story-driven flow.
What is Role-Based Pricing in WooCommerce?
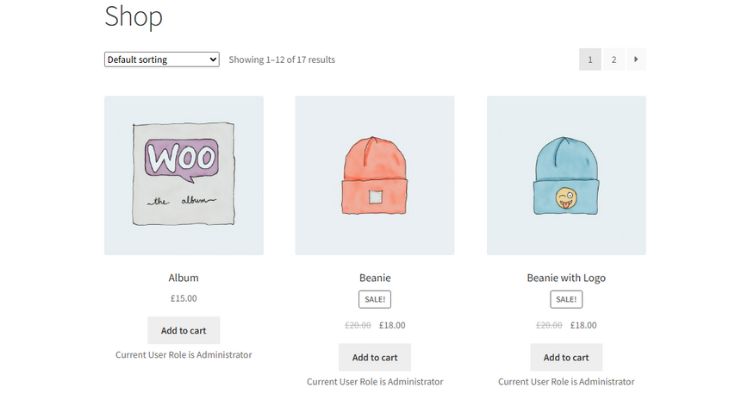
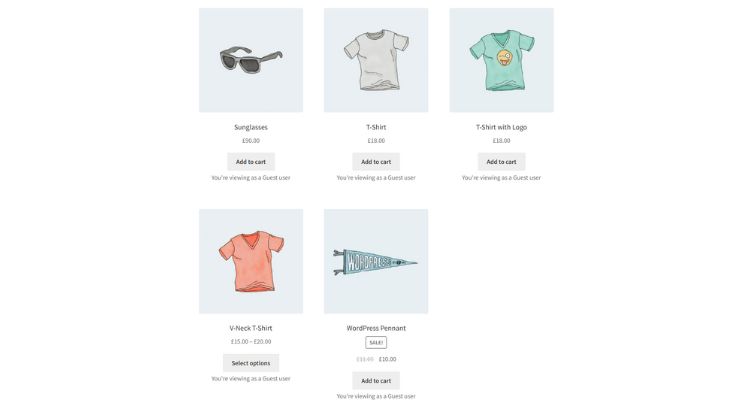
Think of it as price tags that change depending on who’s looking. A wholesaler logs in. Discounted rates. A VIP member logs in. Special price, maybe with free shipping. A guest user? They might not even see prices until signing up.
Instead of one boring flat price, you create layers. Each role sees its own deal. It’s flexible. It’s modern. And it mirrors real business.
Why Use Dynamic Pricing by User Roles?
It’s not only about discounts. It’s a strategy. It’s control. Its growth.
- Fairness. Treat different buyers the way they deserve.
- Personalization. Feels special. Customers notice.
- Profit. Smart segmentation means better margins.
- Efficiency. No need for separate stores.
- Scale. Handle wholesalers and retailers in one dashboard.
Dynamic pricing gives your store structure. No messy manual edits. No confusion. Just clarity.
Real-World Examples: Where It Fits
Imagine this.
A fitness gear shop. Normal customers buy one dumbbell. But gyms? They buy 50. The shop sets wholesale roles. Bulk orders get better pricing.
A clothing brand. They reward loyal “VIP members.” These customers see exclusive prices not shown to others.
A supplier. Different business partners. Each partner role gets its own price. Controlled. Organized. Professional.
It’s storytelling in numbers. Every role sees their chapter.
First things first: Build the Roles
WooCommerce comes with basic roles. Customer. Admin. Shop Manager. Not enough.
You need more. Wholesaler. Partner. VIP. Subscriber.
How?
- Install a role manager plugin like User Role Editor.
- Create custom roles. Name them clearly.
- Assign roles to users in the dashboard. Simple dropdown.
Done. Now each customer has a place. Like actors in a play, waiting for their lines.
Choosing the Right Tool
WooCommerce alone doesn’t cut it. You need a plugin. The right one makes life easier. But which one? Here’s a clear checklist to guide you.
- Compatibility — Check the plugin’s required WordPress, WooCommerce and PHP versions. Make sure it matches your site. If not, don’t risk it.
- Product types supported — It must work with simple products and variable products. Also check for grouped, bundle, and subscription products if you use them.
- Per-variation pricing — Some plugins only change the parent product price. Choose one that lets you set prices per variation.
- Bulk editing & import/export — A real time-saver. Look for CSV support and filters by category, tag or SKU.
- Visibility controls — Can it hide prices for guests? Replace price with a login CTA? Hide Add to Cart? These matter.
- Tax & shipping behavior — Does the plugin work with your tax settings? Can it adjust shipping rates by role? Make sure the plugin documents how it handles tax inclusive/exclusive prices.
- Performance — Big stores need lean plugins. Check whether it caches well and works with your caching plugin or CDN.
- Multisite & multilingual — If you run multiple stores or WPML, check compatibility.
- Developer hooks & API — Good plugins offer filters and actions for custom work.
- Support & updates — Check last update date, changelog, and support response. A plugin that’s not updated often can cause trouble.
- Demo & free version — Try a live demo or a free version first to see how it behaves.
Red flags to avoid
- No recent updates in over a year.
- Very few or no reviews.
- No demo or screenshots.
- Vague or missing docs.
- Requires many paid add-ons for basic features.
Quick Comparison Tip
Make a short pros/cons table for 2–3 candidates. Test them on a staging site. That will save you headaches.
One solid choice? WooCommerce Role-Based Pricing Plugin by Motif Creatives. It covers per-product and per-variation pricing, has a bulk editor, visibility controls and role exclusions. It also offers an admin-friendly interface with quick links and AJAX saves. But still, test it in staging first.
Step-by-Step Setup
Alright, let’s do this. Below is a careful, practical setup path. Follow it on a staging site first.
- Backup your site. Always. Use a reliable backup plugin or your host tools.
- Staging — If possible, install the plugin on a staging site first. Safer that way.
- Check requirements — Confirm your WP and WooCommerce versions meet the plugin needs.
Step 1: Install the Plugin
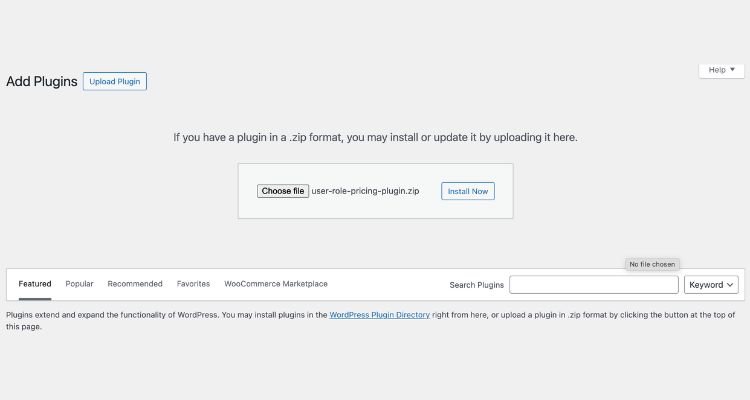
- Go to WordPress dashboard → Plugins → Add New.
- Upload the plugin ZIP or search if it’s in the repo.
- Click Install, then Activate.
- Enter license key if provided. This enables updates and support.
Step 2: Basic Settings and Enable Role-Based Pricing Woocommerce
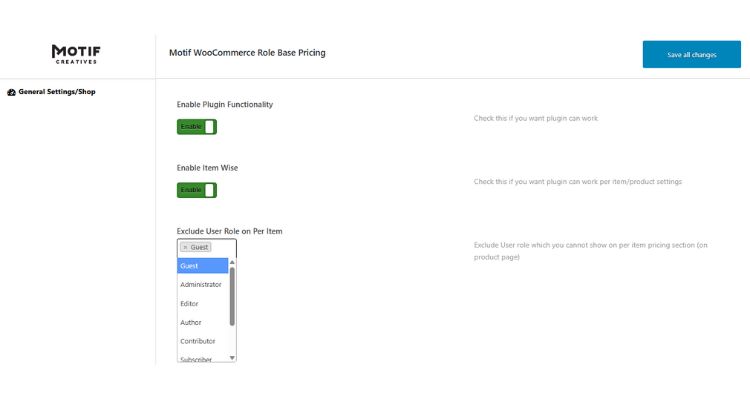
- Find the plugin settings (usually under WooCommerce or a separate menu).
- Enable role-based pricing globally if required.
- Choose default display options. For example: show role price only, or show both original and role price with a strike-through.
- Decide fallback behavior. What happens when no role price exists? Show guest price? Hide price?
Step 3: Map Roles and Sync with Memberships
- If you use a membership plugin, sync roles or map membership levels to user roles.
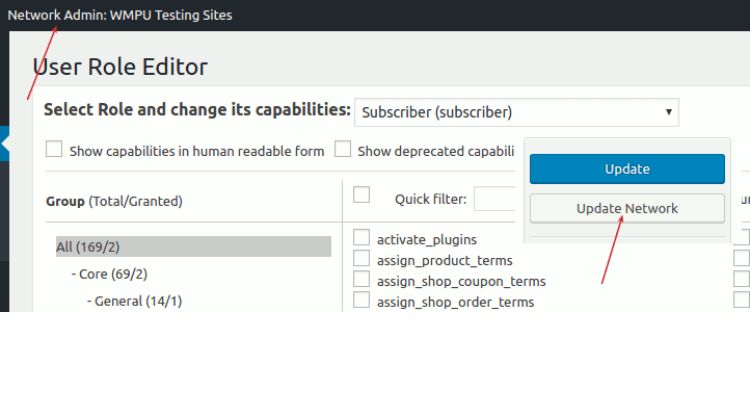
- Create any missing roles (e.g., Wholesaler, VIP) using User Role Editor or Members plugin.
- Assign a few test users to these roles for testing later.
Step 4: Configure Global or Per-Product Rules
- Decide if you will use global rules (apply a single percent discount to a role) or per-product prices. Both can work.
- For global rules: set the percentage or fixed discount for the role.
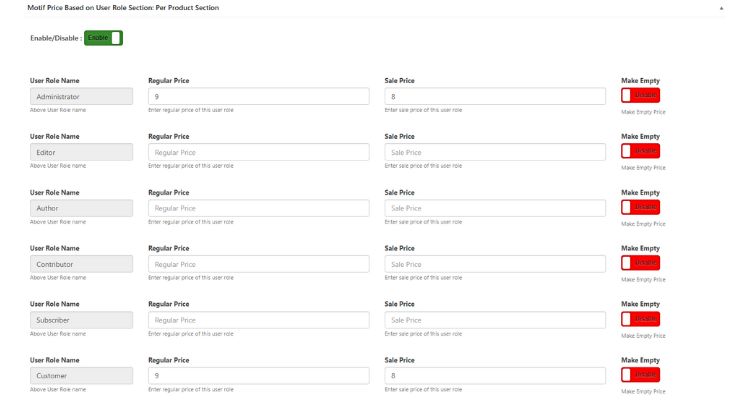
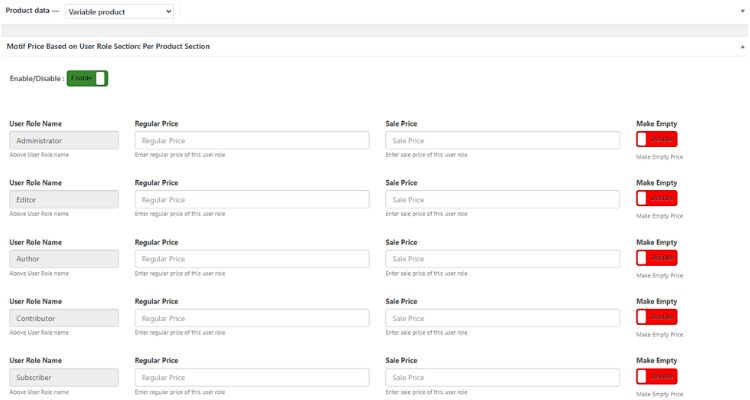
- For product-level control: go to a product and open the new User Role Pricing panel.
- Add regular and sale prices per role. Leave fields blank to hide prices for a role.
Step 5: Set Prices for Variations
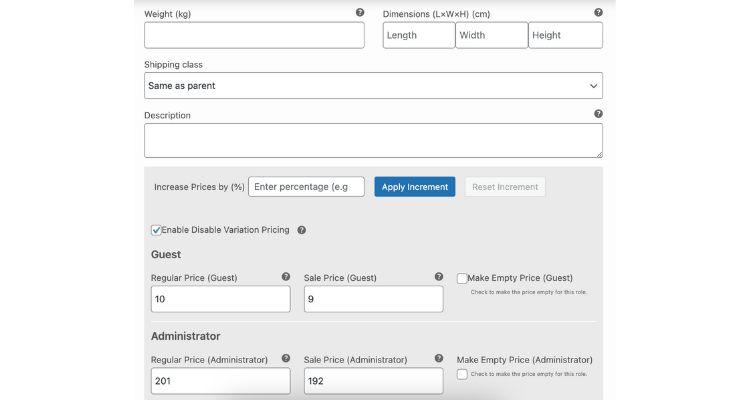
- Edit a variable product.
- Expand each variation and you’ll see role-specific price fields.
- Fill in regular and sale role prices for each variation as needed.
- Save and update the product.
Step 6: Bulk Edit Prices (Practical Example)
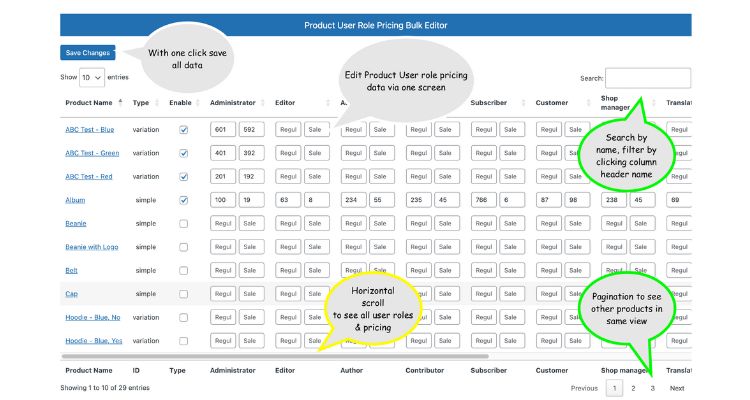
- Open the plugin’s Bulk Editor or Role-Based Price Bulk Editor page.
- Filter products by category, tag or SKU. For example, filter “Bathroom Fixtures.”
- Choose the role to edit (e.g., Wholesaler).
- Pick an action: decrease regular price by 15% or set a fixed price.
- Preview changes if available. Then apply.
- Tip: do small sample runs first on a few products. Confirm results before applying to thousands.
Step 7: Shipping and Taxes by Role
- If the plugin supports shipping by role, configure those rules now.
- Alternatively set up shipping classes or separate shipping zones for role-based shipping.
- Confirm how the plugin calculates taxes. Test both tax-inclusive and tax-exclusive settings.
Step 8: Catalog Mode and Visibility (Optional)
- Turn on catalog mode for guests if you want users to register before seeing prices.
- Set custom messages like “Login to see your price” or a link to register.
- Hide Add to Cart for roles that should not buy online.
Step 9: Testing Checklist
Always test carefully. Here’s a short checklist:
- Shop page: do prices show correctly per role?
- Single product page: variation prices update on selection?
- Cart and checkout: final price equals displayed price?
- Order emails and invoices: show correct price and tax?
- Coupons: stack or exclude with role prices? Test both.
- Subscriptions & renewals: does renewal use role price or original?
- Shipping: role-based shipping charges applied?
- Mobile view: layout and price display look correct?
- Caching: clear cache. Test without cache turned on and off.
Use separate test accounts for each role. Log in as each user and follow the checklist.

Step 10: Troubleshooting Tips
- If prices don’t show, clear caching and CDN.
- Check for plugin conflicts by disabling other price-related plugins.
- Enable WP_DEBUG to catch errors.
- Contact plugin support with a site health report and steps to reproduce.
Final Launch Steps
- Move changes to production once tests pass.
- Announce role benefits to customers with a short email or banner.
- Keep a short internal note explaining role rules so your support team can help customers.
When Role-Based Pricing Works Best
Not every shop needs it. But if you:
- Sell wholesale or bulk.
- Run memberships.
- Manage B2B partners.
- Launch seasonal offers.
Then role-based pricing? A game-changer.
Conclusion
Online shopping shouldn’t feel cold. It should feel fair. Flexible. Personal. That’s what dynamic pricing does. It gives every role a voice. Wholesalers, retailers, VIPs—each gets their deal.
With plugins like this, you save time. Reduce errors. And grow profit. But more importantly? Customers feel valued. They stick around. They come back.
So, if you’re serious about upgrading your WooCommerce store, it’s time. Explore Role-Based Price for WooCommerce. And unlock the power of dynamic pricing.

Inam Ullah Dar
Motif CreativesInam Ullah Dar is a content writer by passion and profession. He started his journey with Motif Creatives. He primarily writes for guest post articles falling under various niches. The main area of his interest and expertise is Web design & Digital marketing. He enjoys reading and writing about healthcare, mindfulness, and well-being to educate people about being happier and lively. His work has been published on many high-authority websites. He believes that writing is an effective way to communicate at better levels.